Getting started on GitHub
In this tutorial you will learn how to set up releaser-pleaser in your GitHub project with GitHub Actions.
1. Repository Settings
1.1. Squash Merging
releaser-pleaser requires you to use squash merging. With other merge options it can not reliably find the right pull request for every commit on main.
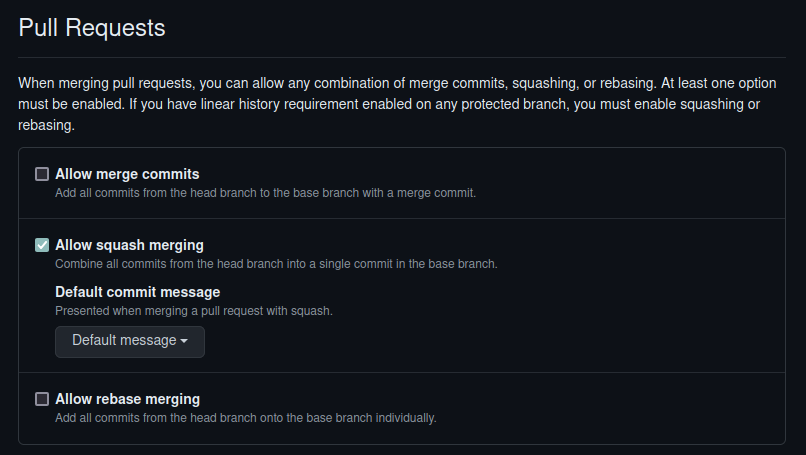
Open your repository settings to page General:
https://github.com/YOUR-NAME/YOUR-PROJECT/settings
In the "Pull Requests" section make sure that only "Allow squash merging" is enabled and "Allow merge commits" and "Allow rebase merging" is disabled.

1.2. Workflow Permissions
releaser-pleaser creates release pull requests for you. By default, Actions are not allowed to create pull requests, so we need to enable this.
Open your repository settings to page Actions > General:
https://github.com/YOUR-NAME/YOUR-PROJECT/settings/actions
In the "Workflow permissions" section make sure that "Allow GitHub Actions to create and approve pull requests" is enabled.

2. GitHub Actions Workflow
Create a new file .github/workflows/releaser-pleaser.yaml with this content. Make sure that it is available on the main branch.
name: releaser-pleaser

on:
  push:
    branches: [main]
  pull_request_target:
    types:
      - edited
      - labeled
      - unlabeled

concurrency:
  group: releaser-pleaser
  cancel-in-progress: true

jobs:
  releaser-pleaser:
    runs-on: ubuntu-latest
    permissions:
      contents: write
      pull-requests: write
    steps:
      - name: releaser-pleaser
        uses: apricote/releaser-pleaser@v0.4.0
3. Release Pull Request
Once this job runs for the first time, you can check the logs to see what it did.
If you have releasable commits since the last tag, releaser-pleaser opens a release pull request for the proposed release.
Once you merge this pull request, releaser-pleaser automatically creates a Git tag and GitHub Release with the proposed version and changelog.
Related Documentation
- Explanation
- Guide
- Reference